Azure Resource Group Recovery in 2025: A DevOps Engineer’s Real-World Guide to Restoring Deleted Resources
🚨 Accidentally deleted a resource group in Azure? Here's what you can (and can't) recover—and how to future-proof your infrastructure from data loss.
Introduction: When DevOps Meets Disaster
Resource Groups in Azure aren’t just folders—they’re governance boundaries, automation units, and lifelines in incident response. As a DevOps engineer, I’ve dealt with one of the worst-case scenarios: a mission-critical RG deleted by accident.
If you think your infrastructure is safe just because it’s in the cloud, you might want to sit down. Azure doesn’t allow you to “undo” a resource group deletion. But with the right combination of Infrastructure as Code (IaC), Azure Backup, soft delete, and CI/CD automation, you can rebuild and recover with minimal downtime.
This guide outlines the strategies I use in 2025 to restore Azure environments, prevent long-term damage, and stay CAF-compliant.
What Happens When a Resource Group Is Deleted?
First, let’s get the bad news out of the way:
-
❌ You cannot restore a deleted Azure Resource Group via a native recovery button.
-
❌ Any resource without backup or soft-delete is lost permanently.
-
❌ Role assignments (RBAC) on the RG level are wiped and must be recreated.
But here’s the good news:
-
✅ You can recover individual services like Key Vaults, Storage Accounts, and App Services if soft delete is enabled.
-
✅ You can rebuild the environment using IaC (Bicep or Terraform).
-
✅ You can recover data using Azure Backup, Site Recovery, or snapshots.
-
✅ You can automate restoration through Azure DevOps or GitHub Actions.
What You Can Recover (and What’s Gone Forever)
| Azure Resource Type | Can Recover? | Notes |
|---|---|---|
| Key Vault | ✅ Yes | If Soft Delete + Purge Protection enabled |
| App Service (Web App) | ✅ Yes | Soft Delete available for 30 days |
| Storage Account | ✅ Yes | Soft Delete required |
| Azure SQL Database | ✅ Yes | PITR if backup was configured |
| Azure VM | ✅ Yes | Via Azure Backup or ASR |
| Azure DNS Zone | ❌ No | No soft delete support as of 2025 |
| NSGs / UDRs | ❌ No | Must re-deploy via IaC |
| Azure Monitor settings | ❌ No | Must be recreated manually or from IaC |
Before You Begin: Are You CAF-Compliant?
The Microsoft Cloud Adoption Framework (CAF) is more than governance—it’s about operational readiness. Here’s how recovery aligns with its pillars:
-
Govern: Enforce policies like mandatory backup tags, soft-delete enabled, tagging owner/criticality.
-
Manage: Monitor for deletions, track backup health, validate restore procedures.
-
Ready: Build your environment using repeatable IaC deployments.
-
Secure: Use RBAC, Key Vault, and identity protection for recovery automation.
Four Proven Strategies to Restore a Resource Group
1. 🔁 Redeploy from Infrastructure as Code (Bicep or Terraform)
If your RG and workloads are defined in code, you’re 90% safe.
✅ Steps:
-
Recreate RG:
az group create --name myapp-prod-rg --location australiaeast -
Redeploy via Bicep:
az deployment group create --resource-group myapp-prod-rg --template-file main.bicep -
Inject environment-specific parameters using a pipeline.
📌 Best Practices:
-
Use module versioning (e.g.,
v1.4.3) -
Externalize secrets (Key Vault reference)
-
Include diagnostics and RBAC in IaC
2. 💾 Recover via Azure Backup and Site Recovery
Azure Backup supports:
-
Azure VMs
-
SQL in Azure VMs
-
Azure Files
-
Recovery Points
✅ Tools:
-
Recovery Services Vault: Central place to manage and restore.
-
Azure Site Recovery: VM-level DR for critical workloads.
⚠️ Gotchas:
-
Backups must be enabled manually or scripted.
-
Recovery Points may not include diagnostic settings or monitoring.
3. 🔄 Restore Soft-Deleted Services via CLI or PowerShell
If Soft Delete is enabled:
az keyvault list-deleted
az keyvault recover --name myvault

az webapp list-deleted
az webapp restore --resource-group my-rg --name myapp
Services supporting soft delete:
-
Key Vault
-
App Service
-
Storage Account (Blobs, Files, Queues, Tables)
-
Azure SQL Database
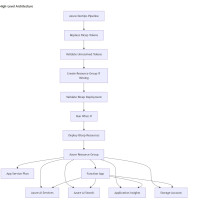
4. 🚀 Automate Recovery via GitHub Actions or Azure DevOps Pipelines
Create a dedicated pipeline for Disaster Recovery (DR):
trigger: none
parameters:
  - name: restoreMode
    default: 'true'
jobs:
  - job: restore_rg
    steps:
      - checkout: self
      - task: AzureCLI@2
        inputs:
          scriptType: bash
          scriptLocation: inlineScript
          inlineScript: |
            az group create --name ${{ parameters.rgName }} --location australiaeast
            az deployment group create --resource-group ${{ parameters.rgName }} --template-file main.bicep
✅ Use Tags:
-
recoveryPlan=enabled -
owner=cloudteam -
backupSource=bicep-v1.3
Simple Real-World Restoration Playbook (Step-by-Step)
Scenario: RG de-prod-rg was accidentally deleted
1. Confirm Deletion
az monitor activity-log list --resource-group de-prod-rg --output table
2. Recreate RG and Deploy Infra
az group create --name de-prod-rg --location australiaeast
az deployment group create --resource-group de-prod-rg --template-file main.bicep
3. Restore Individual Resources
az keyvault recover --name de-prod-kv
az webapp restore --name de-prod-app
4. Reapply Role Assignments
az role assignment create --role Contributor --assignee <objectId> --scope "/subscriptions/xxx/resourceGroups/de-prod-rg"
5. Reconfigure Monitoring, Alerts, Tags
Testing Your Recovery Process (Don’t Skip This)
Run this quarterly:
-
Simulate deletion of a non-prod RG
-
Time the full recovery process
-
Check for missing dependencies (NSGs, diagnostics, RBAC)
-
Score your team on RTO/RPO
Common Mistakes to Avoid
-
❌ Relying on the Portal as your backup strategy
-
❌ Not versioning IaC templates
-
❌ Forgetting to enable Soft Delete for Key Vaults or Storage
-
❌ Not scripting your backup policies
-
❌ Assuming restore steps are intuitive—they’re not
Conclusion: Your Real Recovery Is In Your Pipeline
Restoring an Azure Resource Group isn’t about hoping Microsoft has a magic “undo” button—it’s about engineering resilience into your workflow from day one. The only way to guarantee a fast, stress-free recovery is to make sure your entire environment can be recreated from scratch, automatically, and without guesswork.
Always test your pipelines. Don’t wait for a real disaster to discover that something was missing from your Bicep or Terraform scripts, or that an RBAC role wasn’t applied, or a secret wasn’t referenced from Key Vault. Schedule regular “recovery fire drills.” Treat every deployment as a potential recovery scenario.
And most importantly:
If it’s not defined as code, it doesn’t exist.
Manual tweaks, untracked resources, or undocumented changes are just landmines waiting for the worst possible moment.
By keeping your infrastructure as code, automating your deployments, and actually testing your ability to recover, you’ll build a cloud environment that’s not only powerful and flexible—but truly robust, auditable, and ready for anything.
Disaster recovery isn’t a checklist—it’s a discipline. And the best time to start practicing is before you need it.
“Infrastructure that isn’t defined in code is infrastructure that doesn’t exist.” – Me, after my second RG loss 😅