Introduction
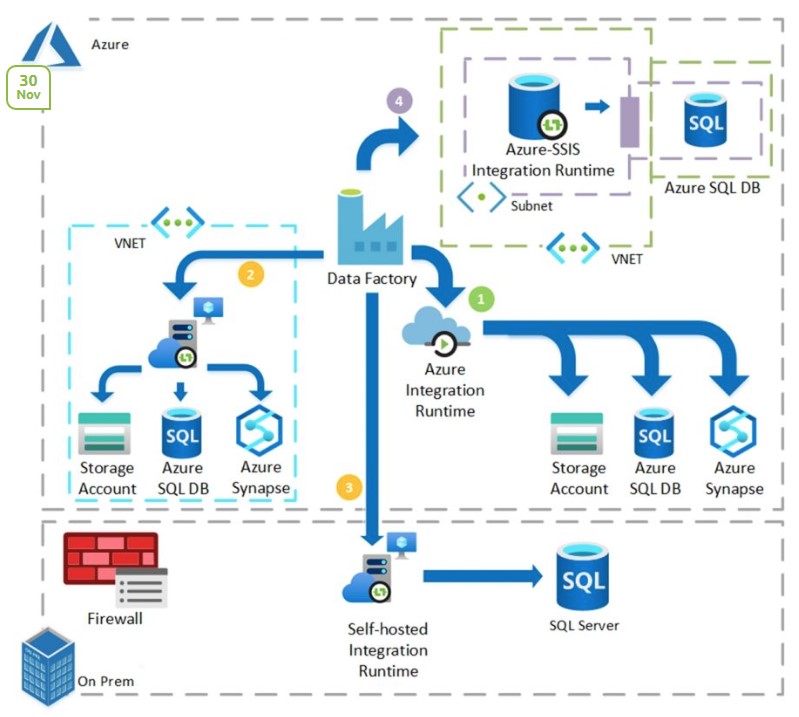
In the digital age, data has become one of the most crucial assets for businesses worldwide. Ensuring secure, efficient, and seamless data flow is of paramount importance. Azure Data Factory (ADF), a cloud-based data integration service, allows you to create data-driven workflows (known as pipelines) to orchestrate and automate data movement and transformation.
While ADF serves as a robust solution for data integration, managing its configurations and operations might seem complex. This is where Infrastructure as Code (IaC) tools like Terraform come into play, enabling effortless management of ADF and its different configurations.
This comprehensive guide delves into deploying Azure Data Factory using Terraform, with a particular focus on extracting data from an on-premises Microsoft SQL Server to Azure Blob Storage via a self-hosted integration runtime.

Azure Data Factory and Terraform
Azure Data Factory (ADF) can ingest data from disparate data stores and transform/process data using compute services like Azure HDInsight Hadoop, Spark, Azure Data Lake Analytics, and Azure Machine Learning. However, manually managing ADF can be cumbersome.
Terraform, a widely-used Infrastructure as Code (IaC) tool, simplifies the process by providing a flexible and powerful way to manage ADF. With Terraform, you can define and provide data center infrastructure using a declarative configuration language.
Extracting Data with Self-Hosted Integration Runtime
A self-hosted integration runtime is a type of runtime that you can install on your on-premises serversor on Azure VM. It acts as a bridge between your on-premises data and the Azure cloud, which can run copy activities between a cloud data store and a data store in a private network.
When performing a data extraction job, you generally create a linked service for your SQL Server and your Azure Blob Storage. Then, you establish a data copy pipeline that uses the self-hosted integration runtime.
In your Terraform configuration, you can conditionally create a self-hosted integration runtime using the count parameter. This feature allows you to decide whether to create the azurerm_data_factory_integration_runtime_self_hosted resource based on the variable's value.
Firewall requirements for on-premises/private network
In an enterprise, a corporate firewall runs on the central router of the organization. Windows Firewall runs as a daemon on the local machine in which the self-hosted integration runtime is installed.
The following table provides outbound port and domain requirements for corporate firewalls:
| Domain names | Outbound ports | Description |
|---|---|---|
*.servicebus.windows.net |
443 | Required by the self-hosted integration runtime for interactive authoring. |
{datafactory}.{region}.datafactory.azure.netor *.frontend.clouddatahub.net |
443 | Required by the self-hosted integration runtime to connect to the Data Factory service. For new created Data Factory, please find the FQDN from your Self-hosted Integration Runtime key which is in format {datafactory}.{region}.datafactory.azure.net. For old Data factory, if you don't see the FQDN in your Self-hosted Integration key, please use *.frontend.clouddatahub.net instead. |
download.microsoft.com |
443 | Required by the self-hosted integration runtime for downloading the updates. If you have disabled auto-update, you can skip configuring this domain. |
*.core.windows.net |
443 | Used by the self-hosted integration runtime to connect to the Azure storage account when you use the staged copy feature. |
*.database.windows.net |
1433 | Required only when you copy from or to Azure SQL Database or Azure Synapse Analytics and optional otherwise. Use the staged-copy feature to copy data to SQL Database or Azure Synapse Analytics without opening port 1433. |
*.azuredatalakestore.netlogin.microsoftonline.com/<tenant>/oauth2/token |
443 | Required only when you copy from or to Azure Data Lake Store and optional otherwise. |
For detailed information regarding security considerations please follow this guide: https://learn.microsoft.com/en-us/azure/data-factory/data-movement-security-considerations
Now, let's take a look at the code that brings all this to life.
The Code: main.tf, variables.tf, and outputs.tf
The main.tf file is where you define what resources will be created. In this case, it includes the azurerm_data_factory resource and the azurerm_data_factory_integration_runtime_self_hosted resource.
resource "azurerm_data_factory" "example" {
  name                           = var.data_factory_name
  location                       = var.location
  resource_group_name            = var.resource_group_name
  public_network_enabled         = var.public_network_enabled
  managed_virtual_network_enabled = var.managed_virtual_network_enabled
}

resource "azurerm_data_factory_integration_runtime_self_hosted" "example" {
  count               = var.deploy_self_hosted_integration_runtime ? 1 : 0
  name                = var.self_hosted_integration_runtime_name
  data_factory_id   = azurerm_data_factory.example.id
  resource_group_name = azurerm_data_factory.example.resource_group_name
}
Next, you define the input values that your configuration will need in the variables.tf file. This includes the name and location of the data factory, and whether you want to enable a public network and deploy a self-hosted integration runtime.
variable "data_factory_name" {
  description = "The name of the Azure Data Factory"
  type        = string
  default     = "example-datafactory"
}

variable "location" {
  description = "The Azure region to create the resources in"
  type        = string
  default     = "Australia East"
}

variable "public_network_enabled" {
  description = "Indicates whether the data factory can use a public network"
  type        = bool
  default     = false
}

variable "managed_virtual_network_enabled" {
  description = "Indicates whether to use managed virtual network"
  type        = bool
  default     = false
}

variable "self_hosted_integration_runtime_name" {
  description = "The name of the self-hosted Integration Runtime"
  type        = string
  default     = "example-runtime"
}

variable "deploy_self_hosted_integration_runtime" {
  description = "Indicates whether to deploy a self-hosted integration runtime"
  type        = bool
  default     = false
}
Finally, you use the outputs.tf file to specify what data your module will return. This can include the primary and secondary keys for your data factory.
output "primary_connection_string" {
  description = "The primary connection string for the Data Factory"
  value       = azurerm_data_factory.example.primary_connection_string
}

output "secondary_connection_string" {
  description = "The secondary connection string for the Data Factory"
  value       = azurerm_data_factory.example.secondary_connection_string
}
Conclusion
Deploying Azure Data Factory using Terraform opens up a flexible and powerful way of managing your cloud-based data integration needs. With a self-hosted integration runtime, you can enable secure, efficient, and versatile data extraction from on-premises SQL Server databases to Azure Blob Storage.
As always, it's vital to stay up-to-date with the most recent AzureRM provider documentation and the official Microsoft Azure Data Factory documentation to utilize the service's capabilities fully. The world of cloud data integration is always evolving, and keeping a pulse on these changes ensures your data workflows remain both efficient and modern.