In these blog post series, I am going to walk you through configuring and protecting Azure Virtual Desktop session host Environment with cloud native security features. This methodology and techniques can be also applicable to other IaaS workloads, i.e. Azure Windows Servers VMs.

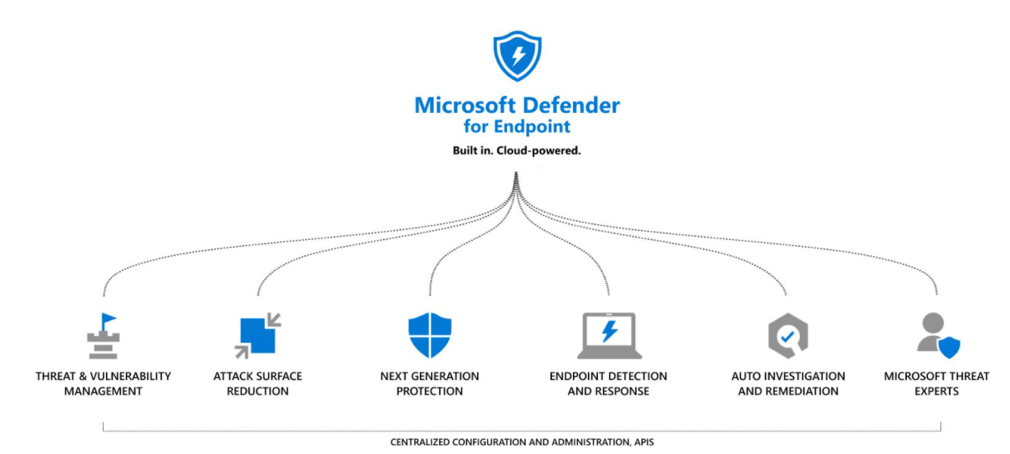
Figure 1 Microsoft Defender for Endpoint
We will cover the following topics:
- Part 1 - Implementing Microsoft Defender for Endpoint to protect Azure Virtual Desktop
- Part 2 - Protecting Azure Virtual Desktop with Security Center's integrated EDR solution
- Part 3 - Managing and monitoring Microsoft Defender for Endpoint
Microsoft Defender for Endpoint (MDATP) Overview
In the modern IT landscape, especially when lots of business workers around the globe started working remotely using technologies like Azure Virtual Desktop, malicious actors who attack environments and devices use methods that are becoming more and more sophisticated, and unfortunately, the average time before a threat is detected is very high. While traditional anti-virus and anti-malware software can still play an important role in defending against these threats, it is not enough to effectively defend our cloud Windows 10 Enterprise (multisession in this case) and Windows Server infrastructure against modern attackers that are determined to cause disruption and implement malicious activities.
This is where Microsoft Defender for Endpoint comes in.
Microsoft Defender for Endpoint, the new name for Microsoft Defender Advanced Threat Protection (MDATP), is a cloud-based online service that provides prevention, detection, and investigation methods that we can use to respond to advanced threats within our organization.
Microsoft Defender for Endpoint is an enterprise endpoint security platform designed to help enterprise networks prevent, detect, investigate, and respond to advanced threats protecting AVD session host infrastructure, as well as other IaaS workloads i.e. Windows Servers VMs, can be secured by adding session host VMs into the corporate MS Defender for Endpoint instance, and by configuring certain policies.
Needless to say, that in production scenario it is critical to onboard Azure Virtual Desktop (AVD) VMs into Microsoft Defender for Endpoint before onboarding end-users.
Add Microsoft Defender for Endpoint into a Microsoft 365 Business Premium
Microsoft Defender for Endpoint (MDATP) Licensing requirements
User side Licensing requirements
According to official minimum requirements for onboarding devices to the service, we must have one of the following user licenses in order to use Microsoft Defender for Endpoint:
- Windows 10 Enterprise E5
- Windows 10 Education A5
- Microsoft 365 E5 (M365 E5) which includes Windows 10 Enterprise E5
- Microsoft 365 E5 Security
- Microsoft 365 A5 (M365 A5)
In the end-user Windows 10 computers scenario, eligible Licensed Users may use Microsoft Defender for Endpoint on up to five concurrent devices. Microsoft Defender for Endpoint is also available for purchase from a Cloud Solution Provider (CSP). When purchased via a CSP, it does not require Microsoft Volume Licensing offers listed.
Server-side Licensing requirements
Microsoft Defender for Endpoint, on Windows Server, requires one of the following licensing options:
- Azure Defender (Azure Security Center) with Azure Defender for Servers enabled
- Defender for Endpoint for Servers (one per covered server)
Azure Defender for servers, which we are going to use to onboard our AVD VMs, already includes Microsoft Defender for Endpoint for comprehensive endpoint detection and response (EDR) and comes with no additional cost.
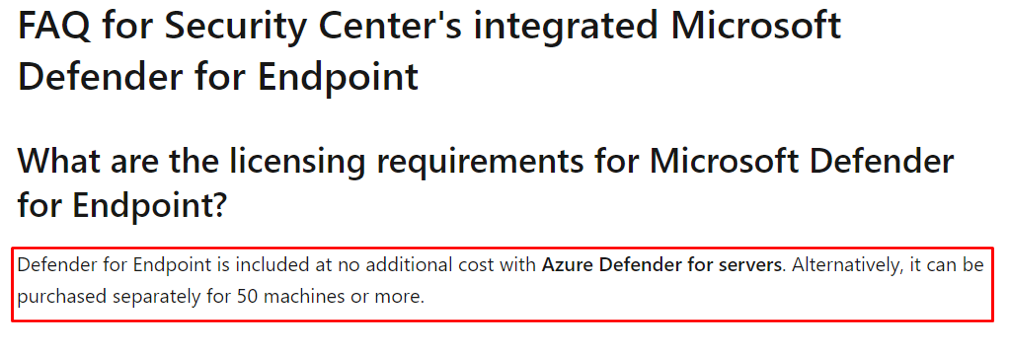
Figure 2 Azure Defender for Servers licencing information
Supported operating systems
The following operating systems are capable of supporting Microsoft Defender for Endpoint:
- Windows 7 SP1 Enterprise
- Windows 7 SP1 Pro
- Windows 8.1 Enterprise
- Windows 8.1 Pro
- Windows 10 Enterprise
- Windows 10 Pro
- Windows Server 2008 R2 SP1
- Windows Server 2012 R2
- Windows Server 2016
- Windows Server 2019
- macOS X
- Linux
- Android
Please note, while AVD Windows 10 Multisession OS is not specifically mentioned as supported OS neither on license requirements page not on Azure Defender how-to page, Security Center depends on the Log Analytics Agent (MMA) which itself has its own supported OS version requirements. If you follow this link, you will notice that Windows 10 Multisession is supported by Log Analytics Agent.
Azure Virtual Desktop License requirements
AVD itself requires us to have one of the following licenses:
- Microsoft 365 E3/E5
- Microsoft 365 A3/A5/Student Use Benefits
- Microsoft 365 F3
- Microsoft 365 Business Premium
- Windows 10 Enterprise E3/E5
- Windows 10 Education A3/A5
- Windows 10 VDA per user
In this demo environment scenario, for the sake of ramping up new skills and to understand how to enable various MS products and integrate them with one another, I will not be using traditional approach adding Microsoft Defender for Endpoint instance via user licensing but instead will be adding Microsoft Defender for Endpoint using device (“server”) based enrolment with Azure Security Center and sign up for it with only having Microsoft 365 Business Premium (note that MDATP not included).
Please note that in this case we will not be required to do any other activities we typically have to do when we want to sign up for Microsoft Defender for Endpoint (MDATP) instance i.e. write email to Microsoft, fill online forms, use credit cards etc.
Let’s begin onboarding. First of all, we need to prepare our Azure AD test environment and sign up for Microsoft Defender for Endpoint trial:
Create A New AAD Tenant
- Go to Azure Portal
- Select Create a resource
- Type Azure Active Directory
- Click Create
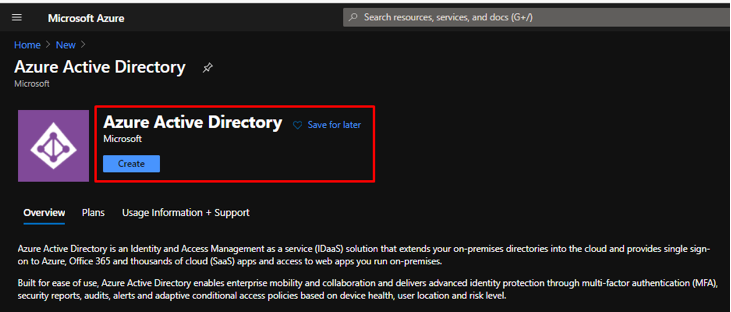
Figure 3 Create A New AAD Tenant
- Type name of your organization and preferred Domain Name, then specify location for storing your Azure AD metadata. As I am located in Australia, Sydney, I selected Australia location
- Click Create:
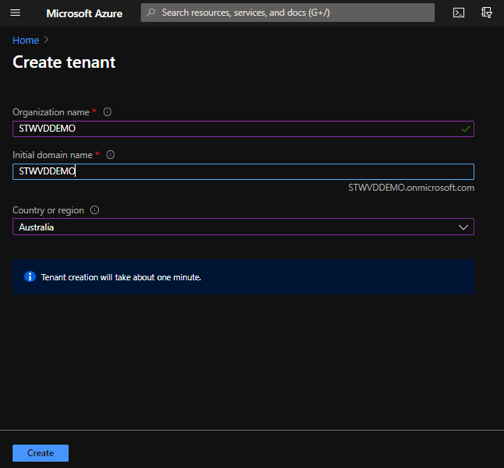
Figure 4 Create A New AAD Tenant - Selecting Tenant Name
- After that wait a little while until Azure AD tenant is created:
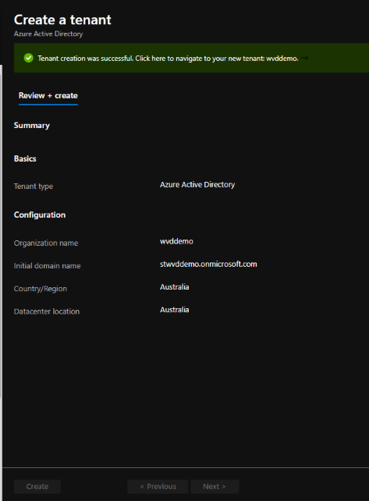
Figure 5 AD Tenant has been created
- Now if you click on “here” will take you to the newly created new Azure AD tenant. We will be logged in the current account which have Global Admin privilege within bot the both tenants

Figure 6 AD Tenant management button
After this step I decided to change Azure Portal theme to the light one.
- Now we can see that we are logged in with our main GA user from the original Azure AD tenant which become a GA enabled user Member in our newly created Azure AD tenant:
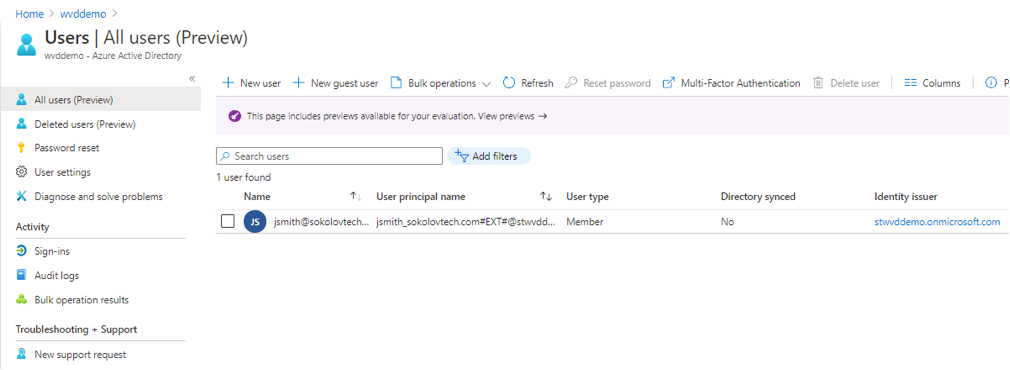
Figure 7 AD Tenant Users View
- Click New user to create a new user in our new Azure AD tenant. Reason is that we do not want to login to the new Azure AD with any of guest accounts. Assign him with Global Administrator Azure AD role
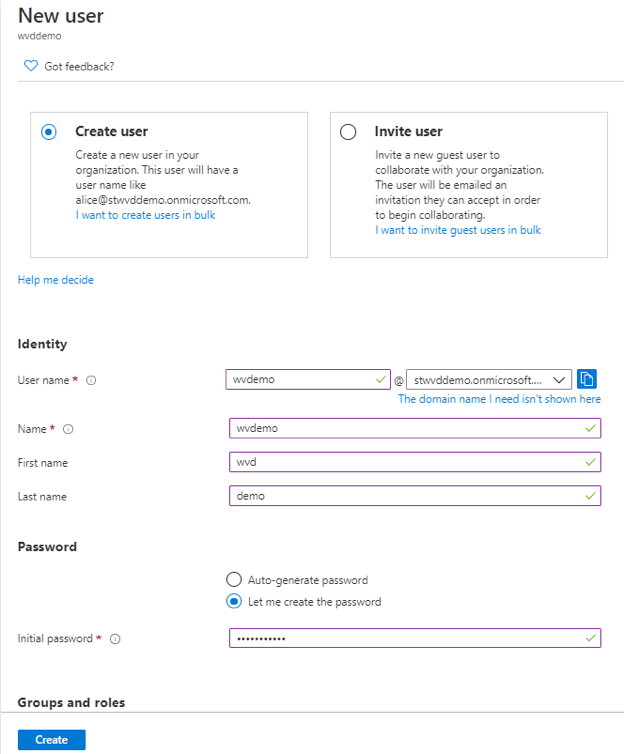
Figure 8 Creating a new user in the newly created Azure AD Tenant
- Verify user creation. As you can see, we now have two user accounts in our new Azure AD directory which was expected.
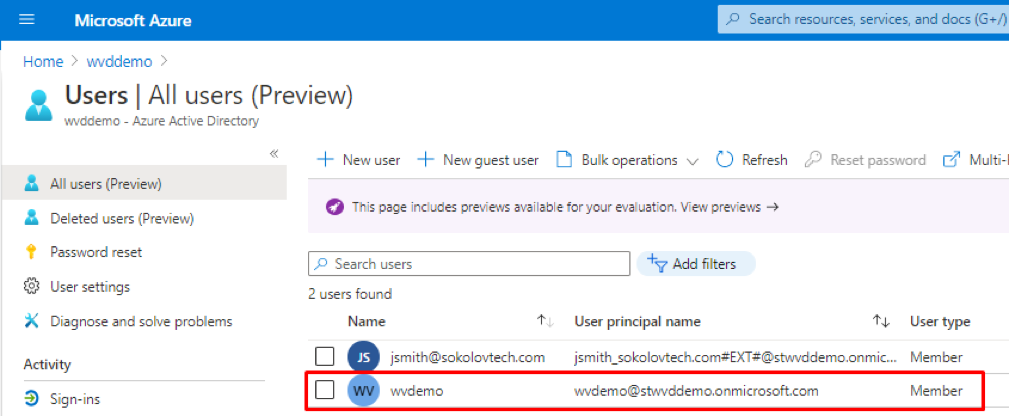
Figure 9 User Verification
- As we want to make our environment as much secure possible, Enable Security Defaults:
Go to Azure Active Directory > Click Properties > Manage Security defaults > Enable Security defaults.
- Optionally, if you prefere to use Conditional Access with MFA to protect AVD environment, confure corresponding Conditional Access policy. Please note, that you have either Azure AD P1 or P2 liceses in order to do that. Conditional Access Policy with MFA is out of the scope of this particular excersice and will be covered in one of my later posts.
Sign Up for the Microsoft 365 Business Premium trial license
- Sign in to admin.microsoft.com with our new user or continue using our initial (guest) user account with GA Admin role assigned
- Go to Billing and then Purchase services
- Find Microsoft 365 Business Premium
- Click Details
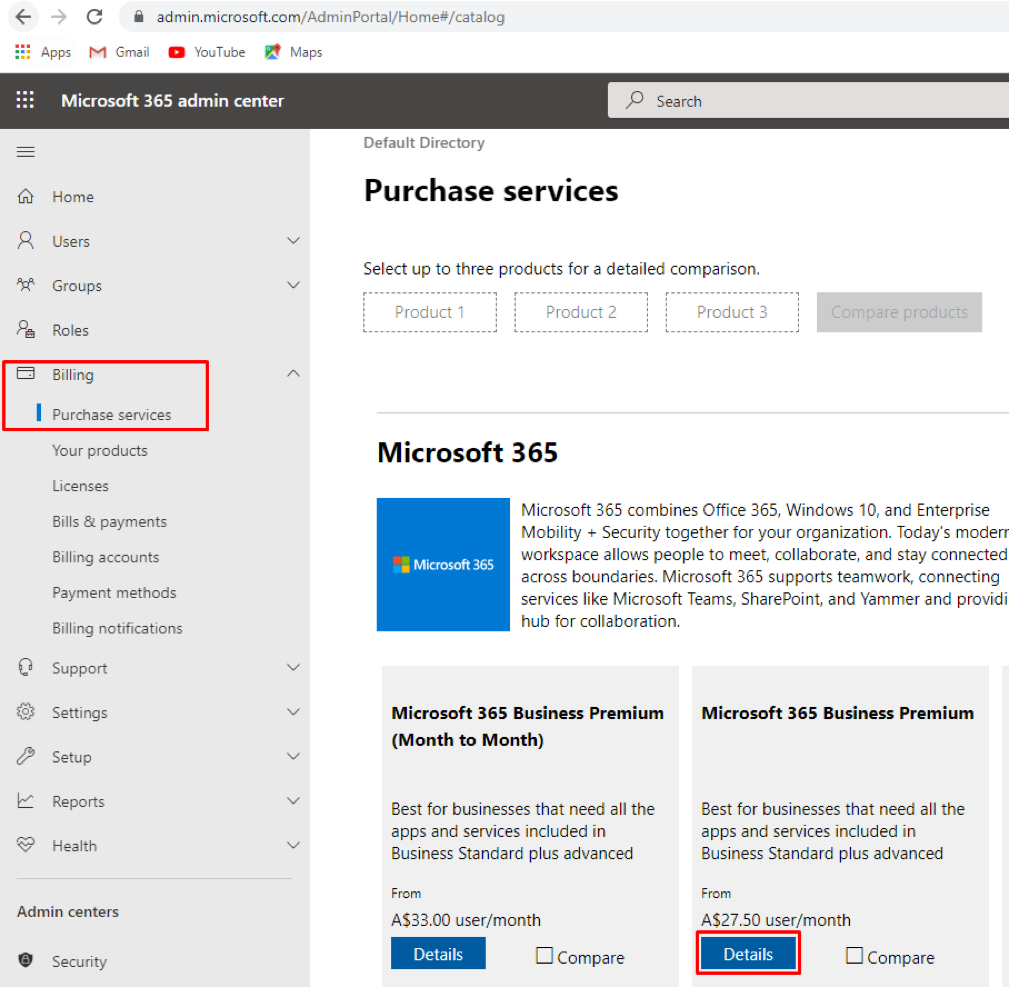
Figure 10 Signing Up for a free Microsoft 365 Business Premium trial
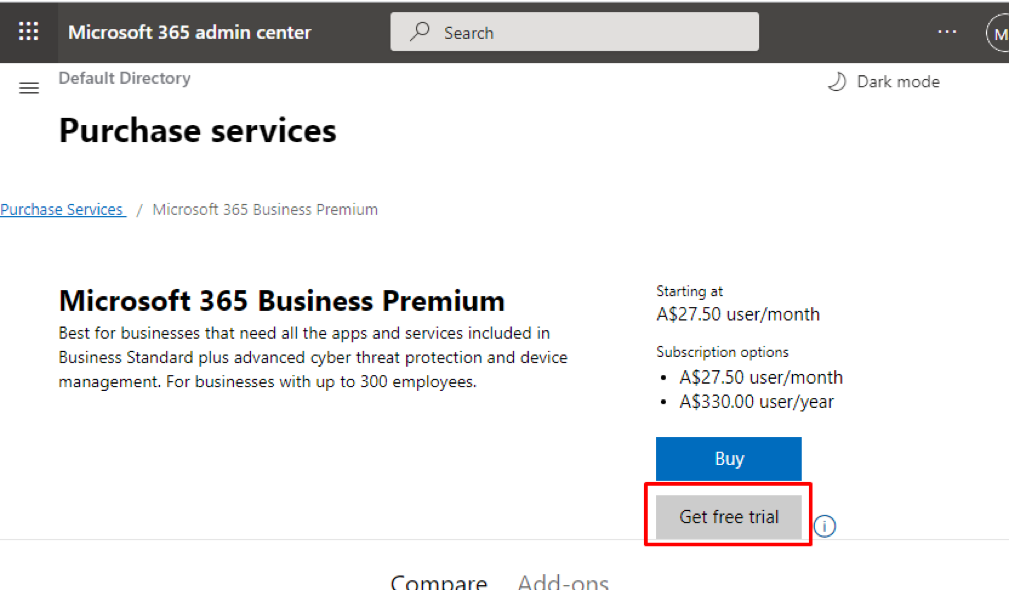
- Choose Get free trial.
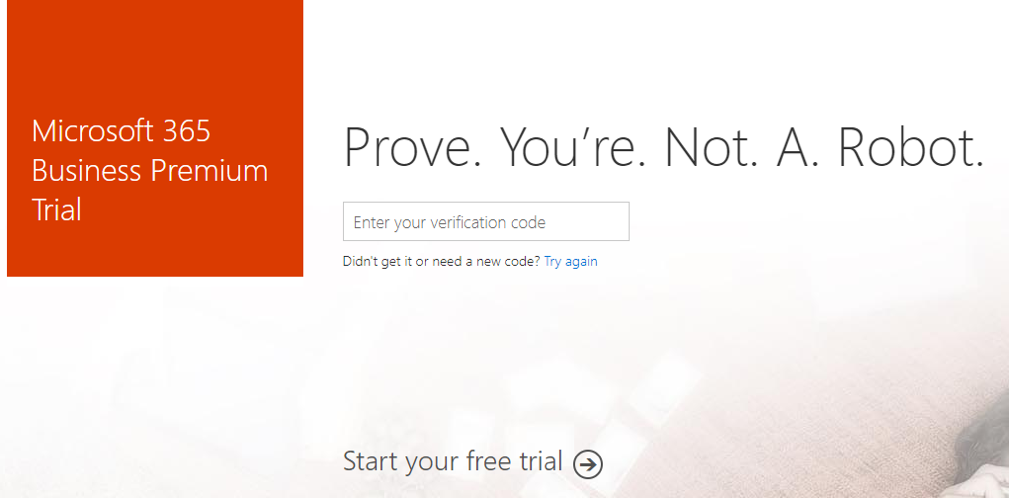
- Type your number And Click Text Me

Type Confirmation number from SMS message and Click Start you free trial
- Confirm trial
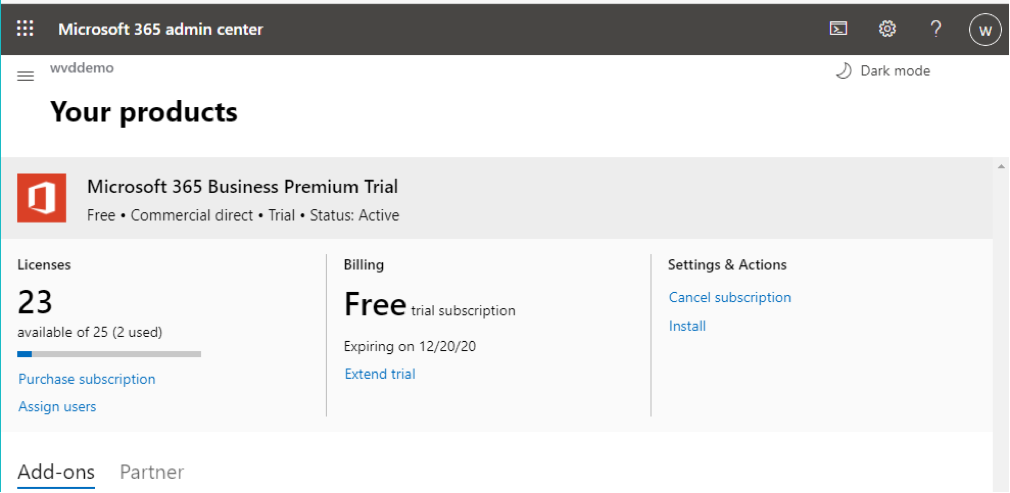
- To verify that our license is active, go to Billing, but now go to Your products to ensure that the trial is working.
Add Microsoft Defender for Endpoint (MDATP) into the Azure AD tenant
Assumptions:
Let’s assume that after creating new Azure AD tenant you also done the following:
- Activated your free trial subscription or using your MPN or MSDN ones. I do not want to go into details on how to activate a trial subscription. Follow the simple process to get a new one:https://azure.microsoft.com/en-us/free/
- Deployed a basic Azure Landing Zone – VNet and a subnet to place our AD DS domain controllers and session hosts in. I've already deployed Azure CAF foundations blueprint and have the following landing zone in place. Please note that I am no using Hub-And-Spoke topology as recommended my industry best practices just to simplify my environment:
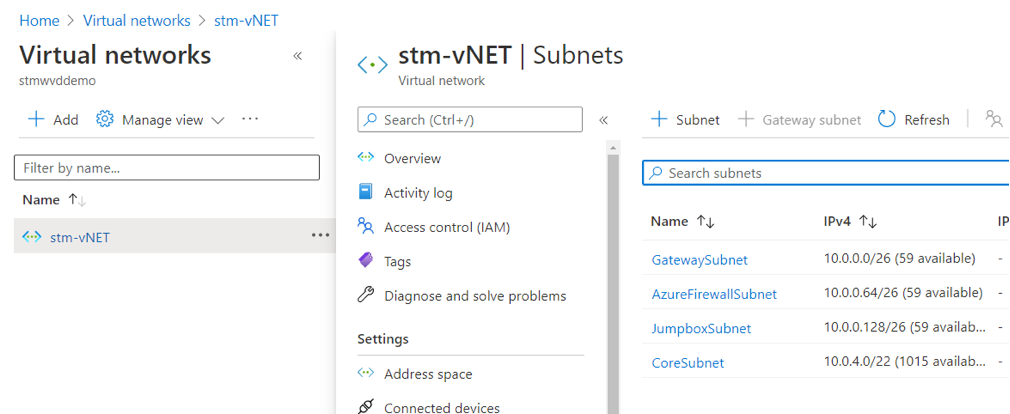
Figure 12 Demo environment VNet setup
If you want to learn more on how to deploy CAF Foundations and CAF Landing Zone (Migration) Azure blueprints, check out one of Azure Academy videos: https://www.youtube.com/watch?v=rfPoMVXnBIk
Also, check this MS page to get better understanding on how Landing zone in enterprise-scale should look like: https://docs.microsoft.com/en-us/azure/cloud-adoption-framework/ready/enterprise-scale/architecture
- Deployed a Log Analytics workspace (optional) which will help us to bring MDATP in by using Azure Security Center VM agent Auto-Provisioning feature. If not, Azure Security Center (ASC) can deploy the default one for you which will be described in one of our next steps. I created my stm-sharedsvcs-log Log Analytics workspace in Azure Australia Southeastlocation as a part of CAF foundationsblueprint deployment.
- Next, for successful testing of our demo environment, we need to have an Active Directory Domain Services, i.e. IaaS domain controllers or Azure Active Directory Domain Services (Azure AD DS) managed instance. In my environment I already configured AD DS domain localbased on one AD Domain Controller Windows Server 2016 VM called “addc-01-vma”. Then I deployed the second Windows Server 2016VM adc-01-vma and Installed AD Connect application using express install, SSO enabled to sync objects between my IaaS AD DS and my Azur AD tenant on order to be able onboard my session hosts into Microsoft Defender ATP.
- Deployed AVD Host Pool and two Windows 10 Multisession session host VM called hp01vm-0 and hp01vm-1
To summarize, my VMs setup looks like this:

Figure 13 Demo VMs
When it comes to my AD DS setup, I created dedicated OU called AVD, and placed my both session hosts in the sub-OU called HP01. Later I will assign a dedicated GPO to run my onboarding script against those VMs.
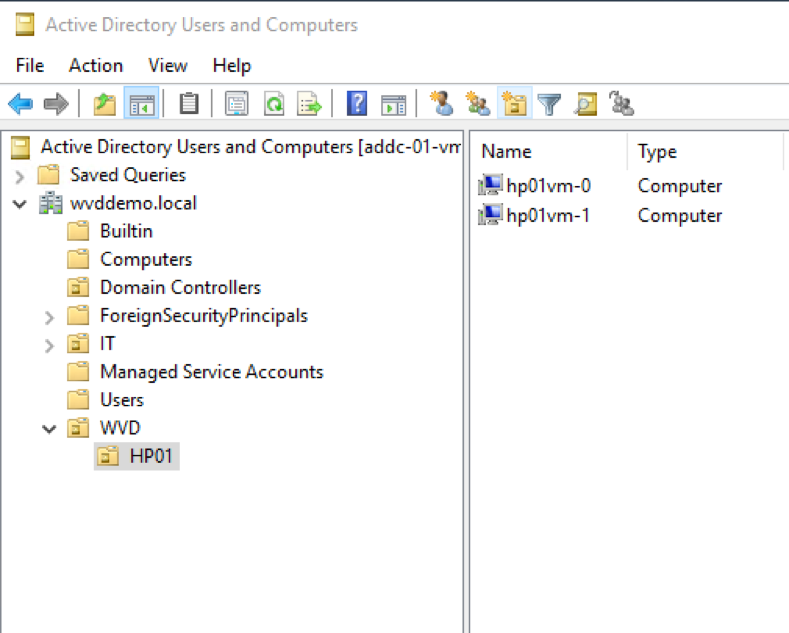
Figure 14 AVD sub-OU setup
- Finally, we need to make sure that our VMs are Hybrid AD joined.
- Go to Azure Portal
- Active Directory
- Devices
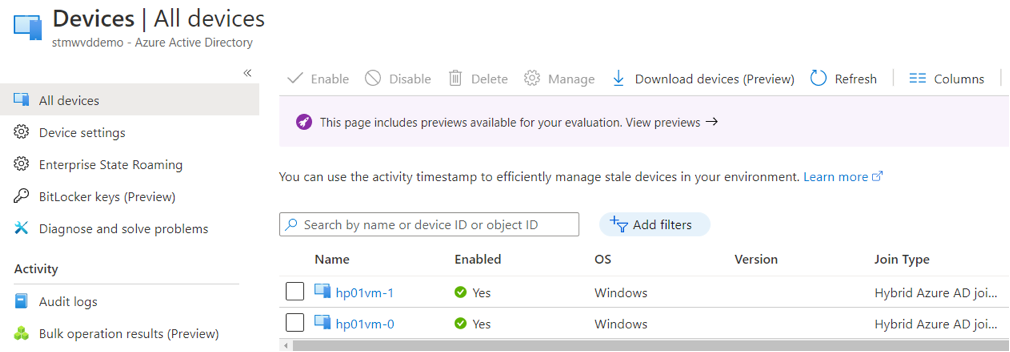
Figure 15 Hybrid-joined AVD Session host VMs
Note:
By default, if you join Windows 10 VMs to the on-premises domain and configure AD Connect, they will be automatically set to be Hybrid AD Joined. If you have any issues, check this article (especially “Configure hybrid Azure AD join” paragraph) to make sure your settings are correct.
Bringing in Azure Defender for Endpoint (MDATP) instance
Let’s continue from here by starting bringing in Azure Defender for Endpoint (MDATP) instance into our environment:
- Go to Azure Security Center
- Go to Getting Started Menu item
- Select Our Subscription
- Click Upgrade
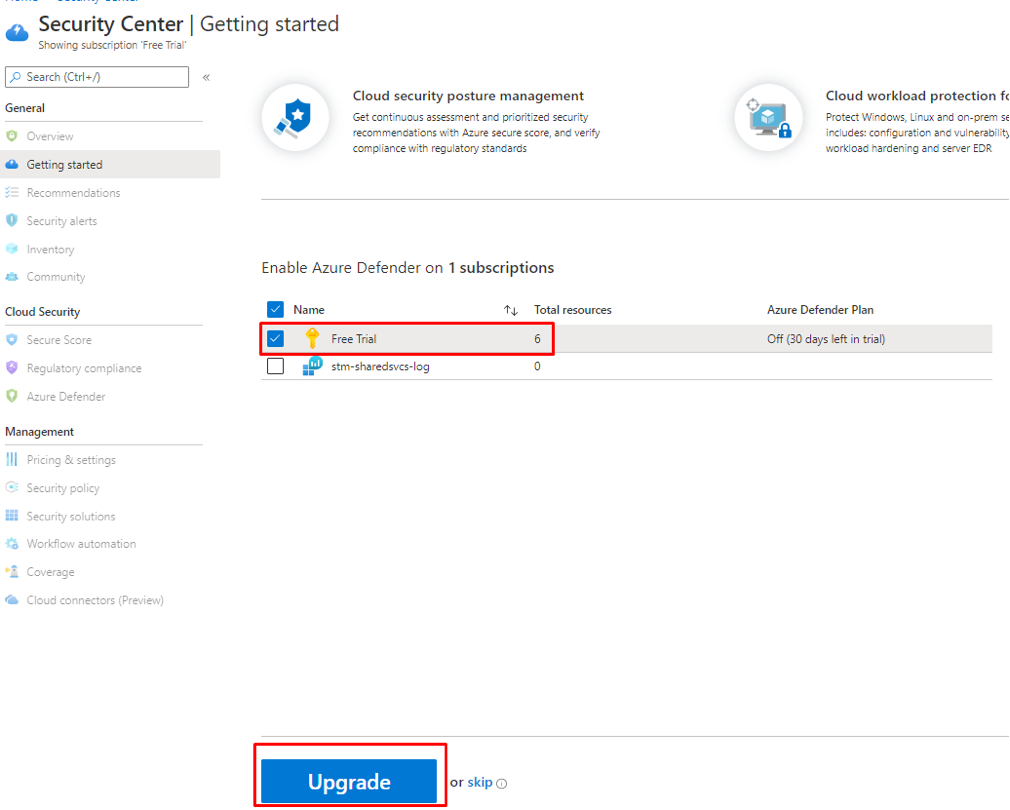
Figure 16 Upgrade Azure Security Center Free tier to Azure Defender
- Click Install Agents
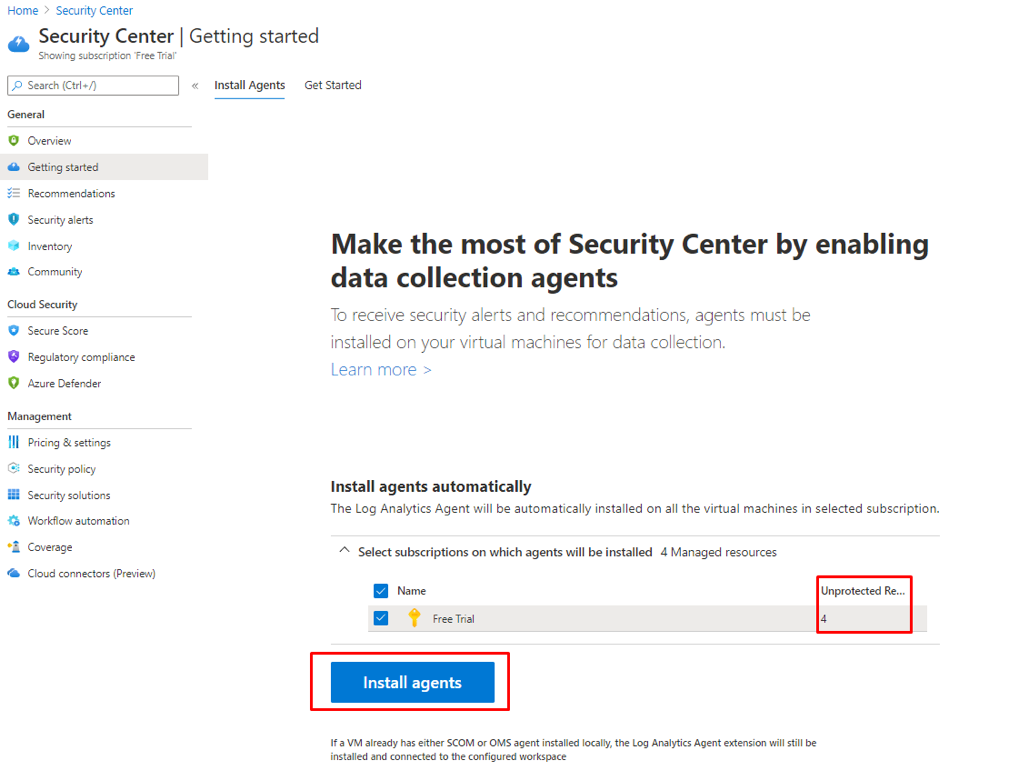
Figure 17 Azure Security Center Install Agents vie
As I already deployed 4 VMs, they will be presented in the above view as Unprotected Resources.
- Go down to Pricing and Settings menu.
As you can see, we have Azure Defender Plan (former Azure Security Center Standard pricing tier) enabled under Pricing & Settings.
Let’s onboard our VMs into Log Analytics workspace and bring our MDATP instance in
- Go back to Azure Security Center, Pricing & Settings, Select Our Subscription
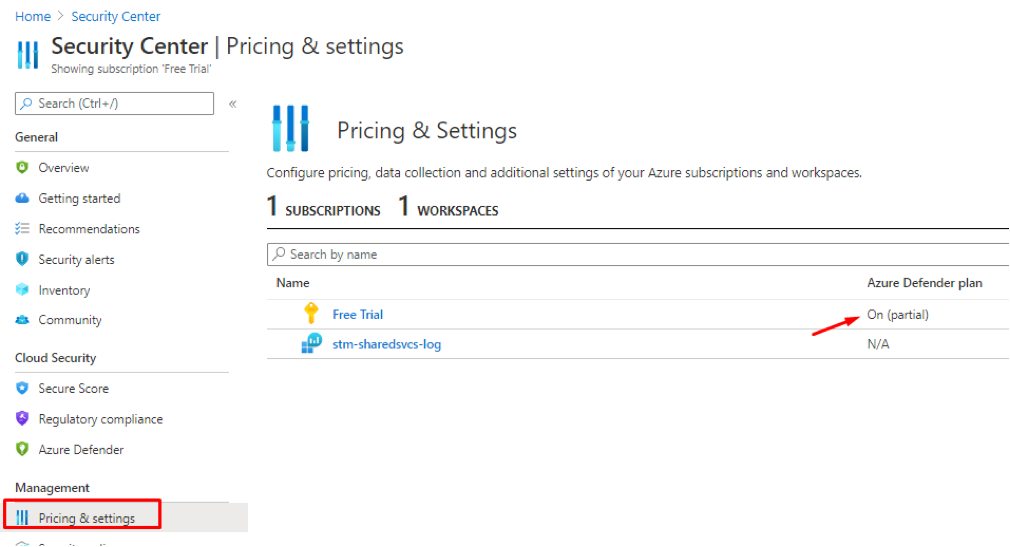
Figure 18 Azure Defender plan verification
- Click on our Trial subscription
- As we are going to focus on is Threat protection for Azure VMs and non-Azure servers and Server EDR (which is provided via Azure Defender for Endpoint MDATP), at a bare minimum make sure that we are using Azure Defender plan and Azure Defender for Servers toggle set to On.
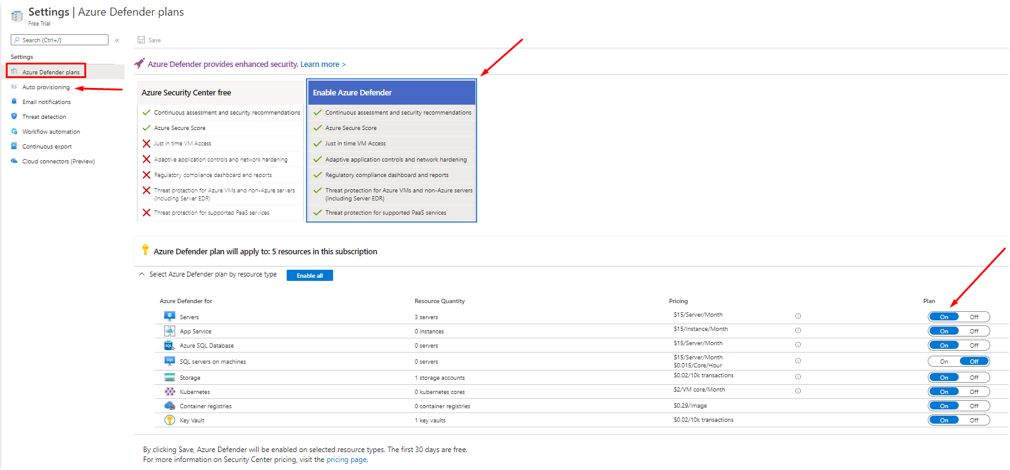
Figure 19 Azure Defender for Servers verification
- Click on Auto Provisioning on the left side
- Make sure that Log Analytics Agent for Azure VMs toggle set to On And turn it on for Microsoft Dependency agent (preview). On the right site either leave Connect Azure VMs to the default workspace created by Security Center or choose whatever LA Workspace you have in your environment by clicking edit.

Figure 20 Editing agent auto provisioning configuration
- I am selecting the custom (“different”) LA Workspace I created before in Australia Southeast region.
- Tick Apply workspace reconfiguration to monitored VMs checkbox
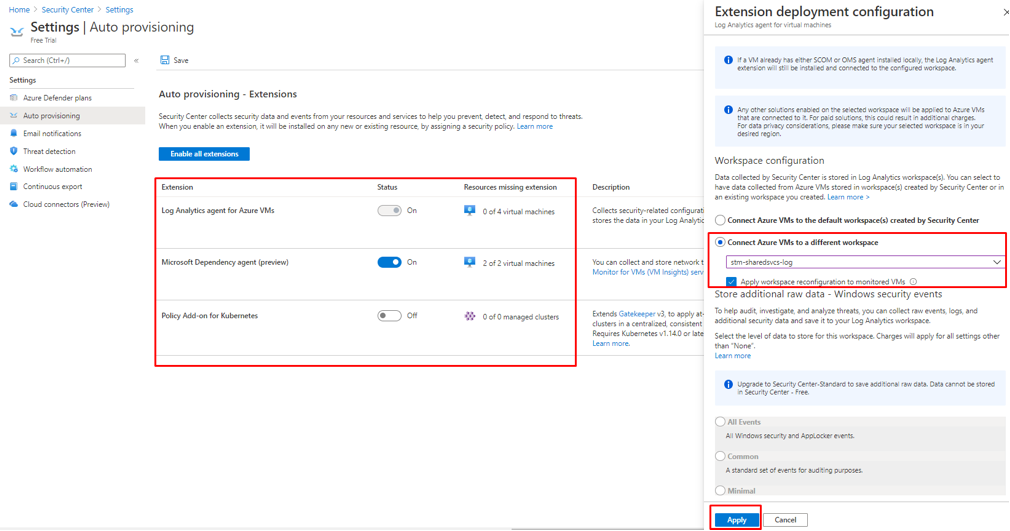
Figure 21 Selection custom LA Workspace
- Click Apply, and Save
- Go back to Pricing and Settings, Click on our LA Workspace
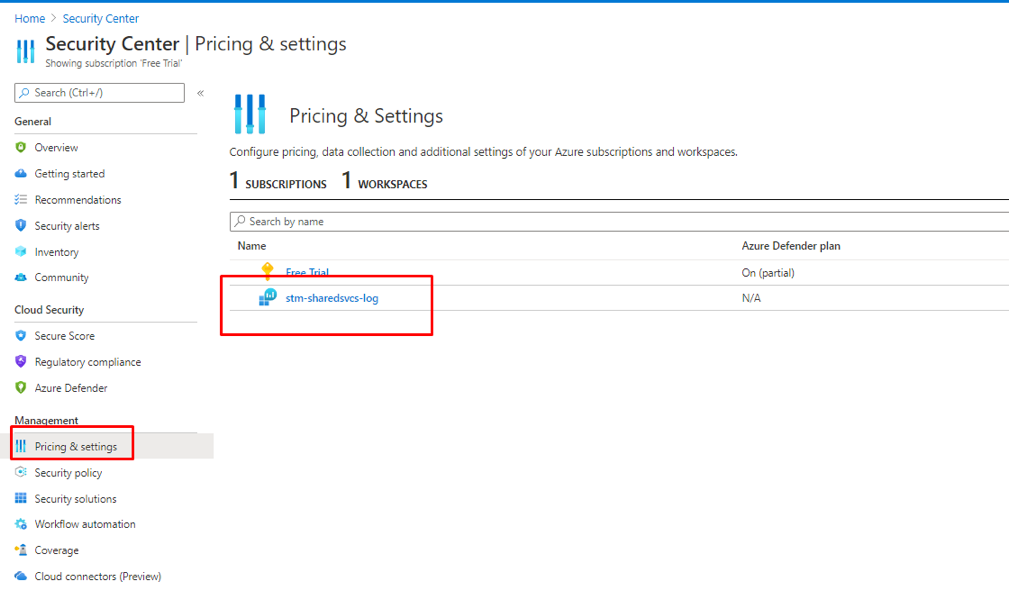
Figure 22 Selecting Log Analytics workspace
- Select Enable Azure Defender, Click Save

Figure 23 LA workspace - Enabling Azure Defender Plan
- Go to Treat Detection menu
- Verify that “Allow Microsoft Defender for Endpoint to access my data” is selected.
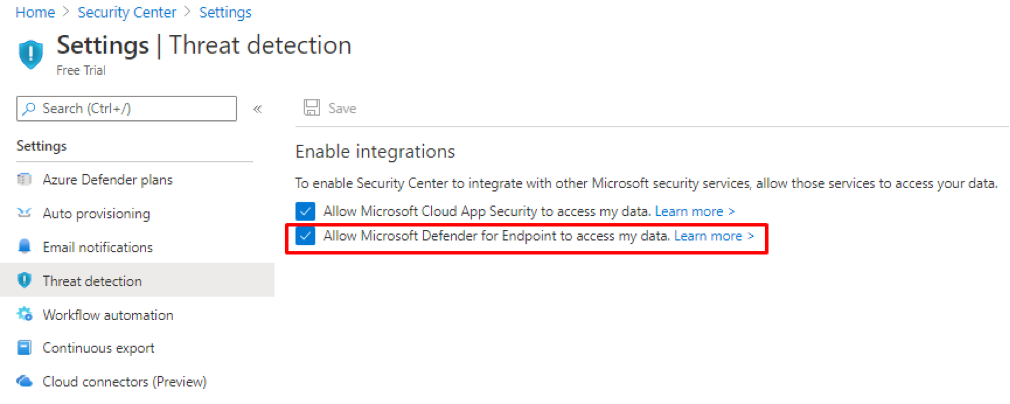
Figure 24 Azure Defender Treat Protection Verification
It can take some time to VM agent been provisioned and onboarded to our Log Analytics workspace, so be patient and wait a little while.
- As a final check, go to our Log Analytics workspace, Workspace Data Sources and Select Virtual Machines. Verify that all our VMs connected to the same LA Workspace
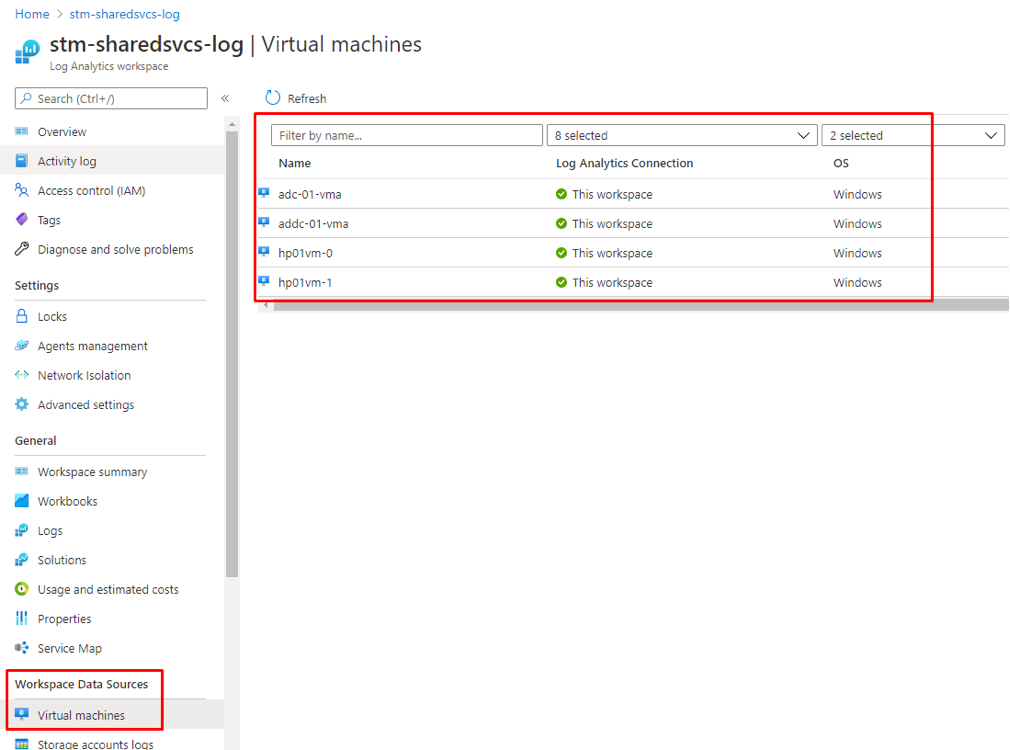
Figure 25 Verifying connected to Log Analytics VMs data sources
- Go to our Log Analytics workspace and check the associated Azure Defender (ASC) solutions deployed.
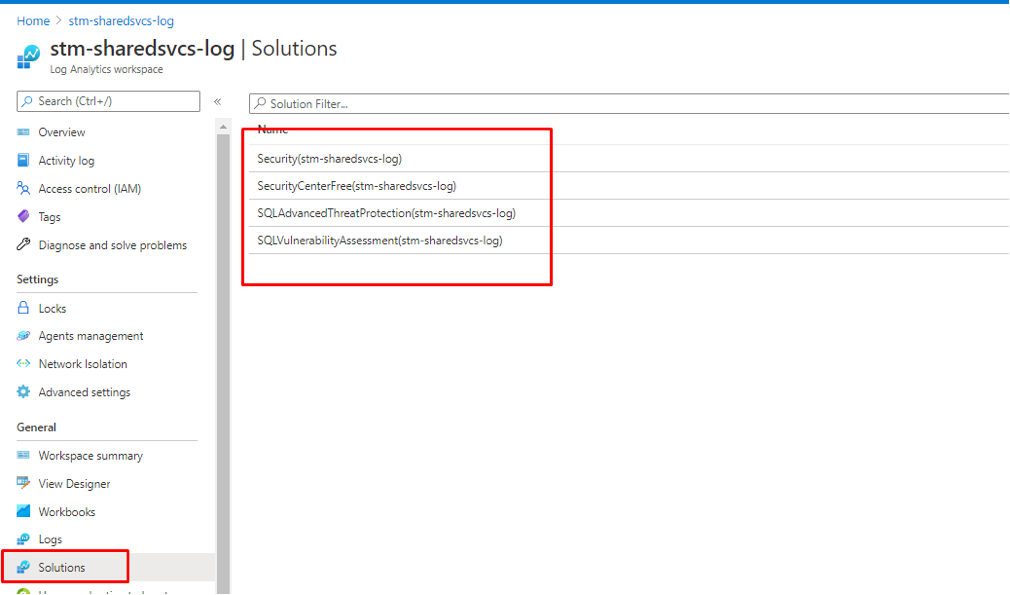
Figure 26 Azure Defender Onboarded Solutions
After that, we are going to play a waiting game and give Azure some time to onboard the virtual machine into Azure Defender (former Azure Security Center Standard tier) and create the Microsoft Defender for Endpoint (ATP) instance, it’s time to check in on what we do and don’t have access to.
First of all, the indicator that we should have Microsoft Defender for Endpoint instance available or will be available shortly is the following:
- Go over to http://securitycenter.microsoft.com/ , and then Device Inventory where we can see that our two Azure VMs running Windows Server 2016 VMs have been enrolled.
Windows Server 2016 and Windows Server 2019 support auto enrollment into Azure Security Center and Microsoft Defender for Endpoint via the Microsoft Monitoring Agent (MMA), so we don’t need to manualy onboard those server OS VMs into it. As we are focusing on onboarding of our Windows 10 multisession VMs into Microsoft Defender for Endpoint, we will cover corresponding enrollment steps a bit later.
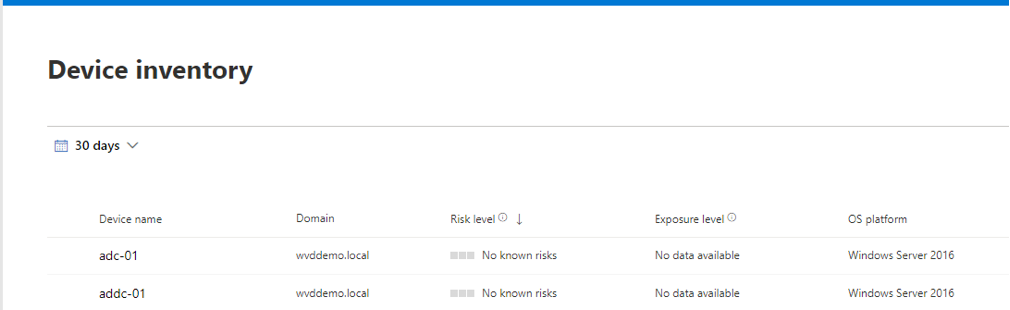
Figure 27 Confirming that server VMs have been onboarded into MS defender
As you can see, there are two Windows 2016 servers VMs ADC-01 and ADDC-01 have been enrolled and represent our addc-01-vma and adc-01-vma Azure VM instances.
Onboarding AVD Windows 10 multisession VMs into Azure Defender for Endpoint
Now I am just going to follow the official MS guide on how to onboard Windows 10 devices into Azure Defender for Endpoint, and also going to add some value into that guide by adding some screenshots. It can we either generic Window 10 IaaS workloads, or Azure Virtual Desktop VMs
I am going to login directly to my Active Directory Domain Controller addc-01-vma VM to perform the following onboarding management tasks from there:
- Login to Microsoft Defender Security Center https://securitycenter.windows.com/
- In the navigation pane, select Settings > Onboarding.
- Select Windows 10 as the operating system.
- In the Deployment method field, select Group policy.
- Click Download package and save the .zip file.
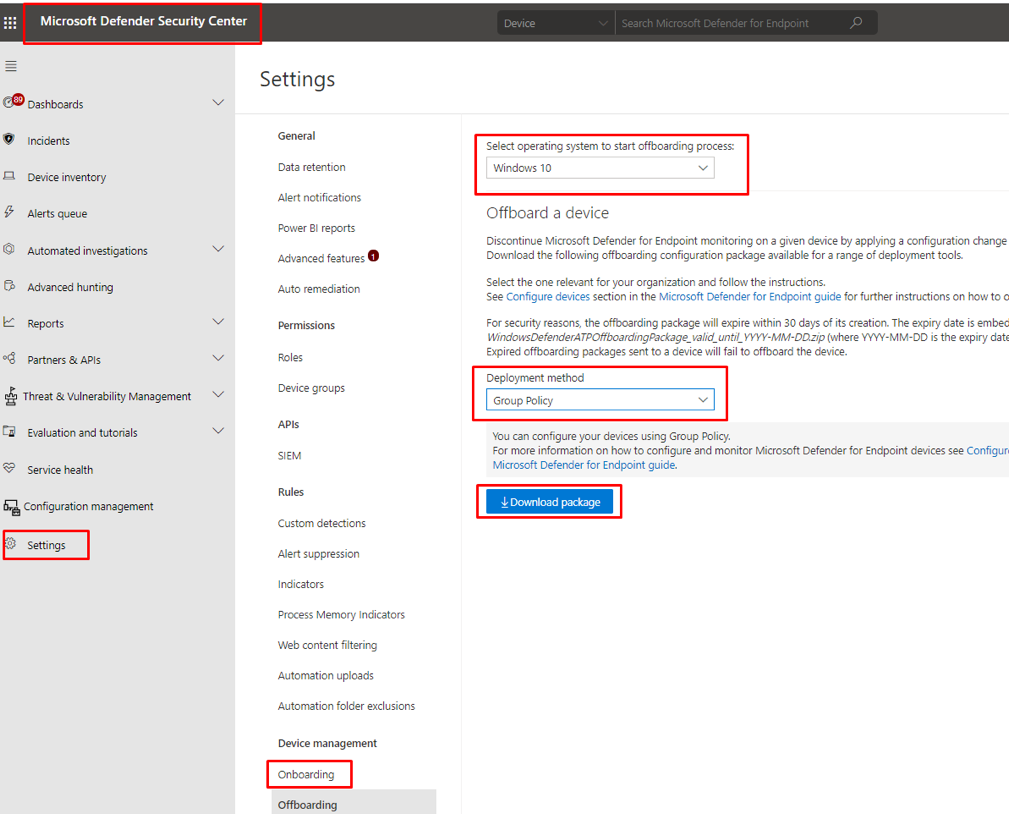
Figure 28 Selecting Group Policy deployment method
- Extract the contents of the .zip file to a shared, read-only location that can be accessed by the device. You should have a folder called OptionalParamsPolicy and the file WindowsDefenderATPOnboardingScript.cmd.
In this case I placed that onboarding script into the following Sysvol folder:
\\Wvddemo.local\sysvol\wvddemo.local\scripts\
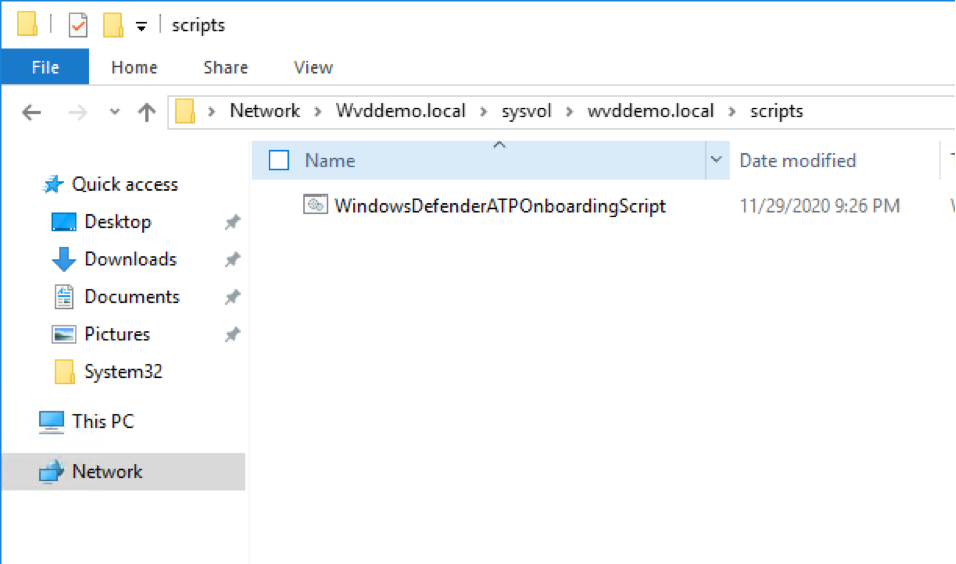
Figure 29 Onboarding script folder
- Open the Group Policy Management Console (GPMC), right-click the Group Policy Object (GPO) and click New.
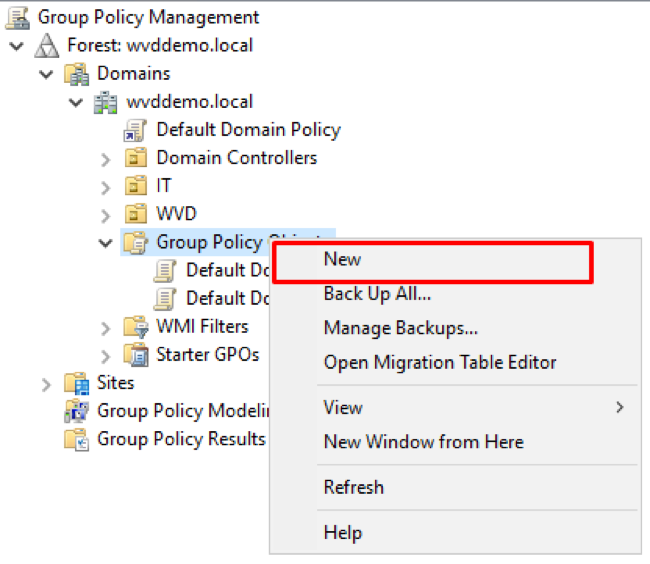
Figure 30 Creating new GPO
- Type desired name of your New GPO, i.e. HP01 and then click OK
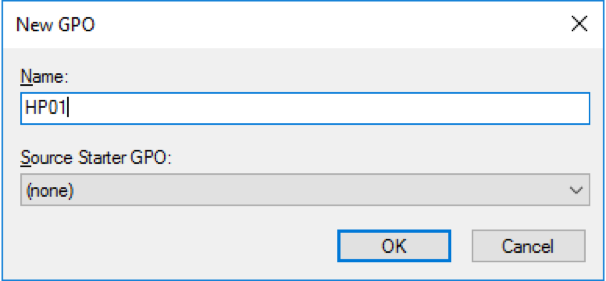
Figure 31 New WVD GPO
- The new GPO will be created and pretty much ready for configuring.
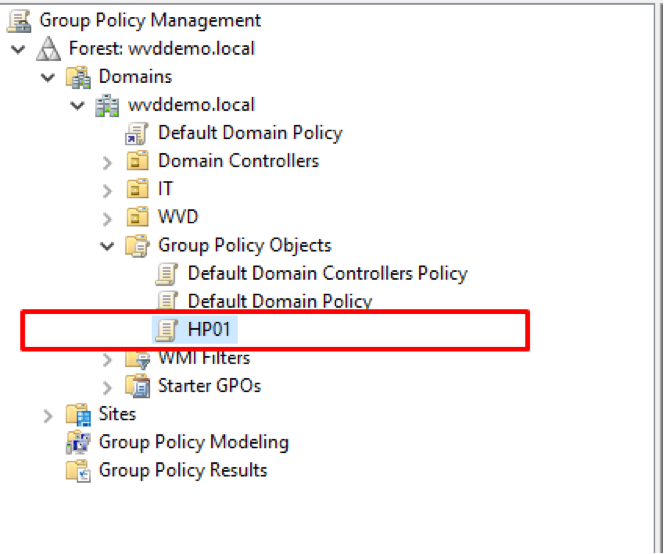
Figure 32 Selecting new WVD "HP01" Group Policy Object
- Right click on our HP01 sub-OU, Link an Existing GPO
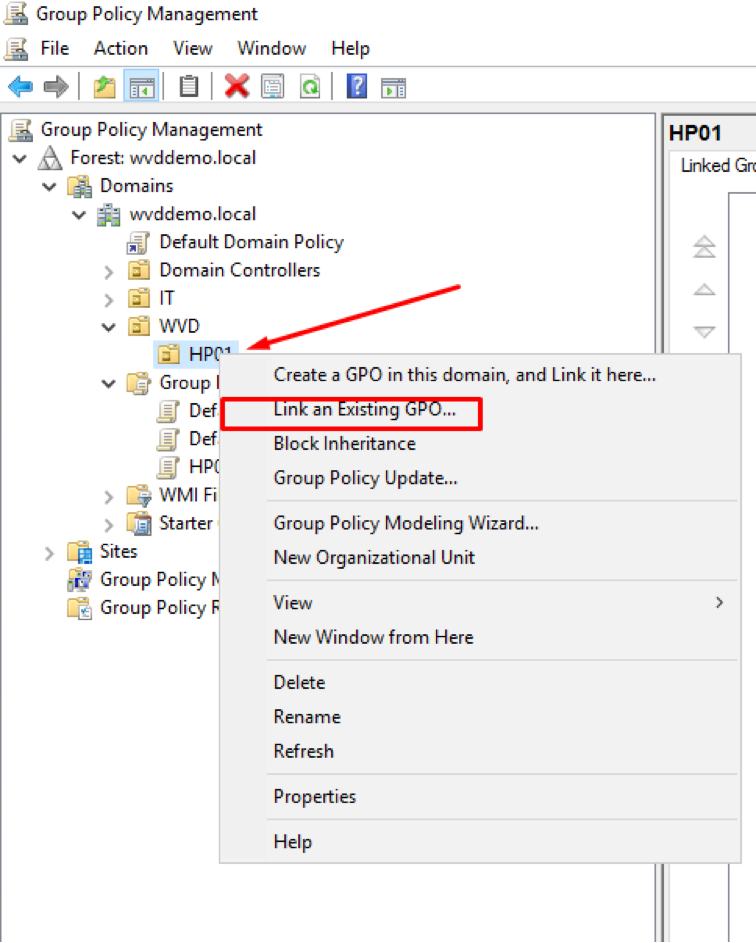
Figure 33 Linking new WVD Group Policy Object to HP01 OU
- Select our newly created GPO HP01, click OK
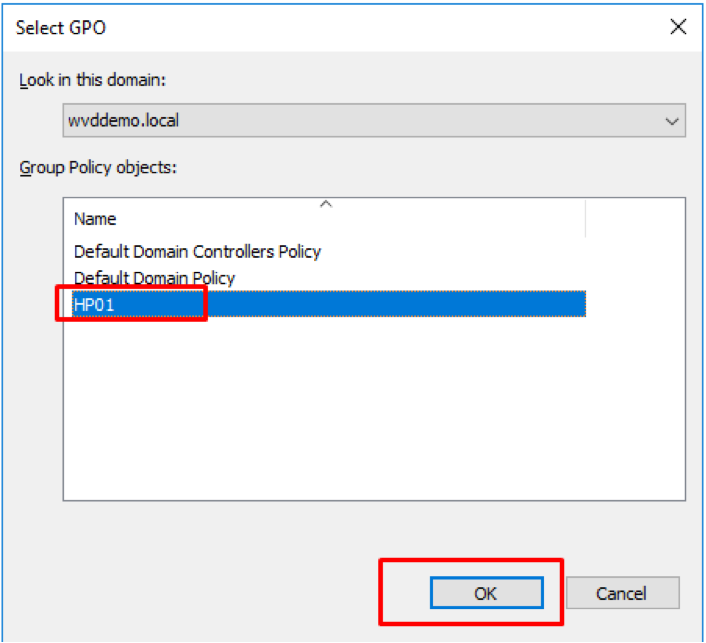
Figure 34 Linking WVD Group Policy Object
- Under our sub-OU, locate our linked GPO Object, click Edit
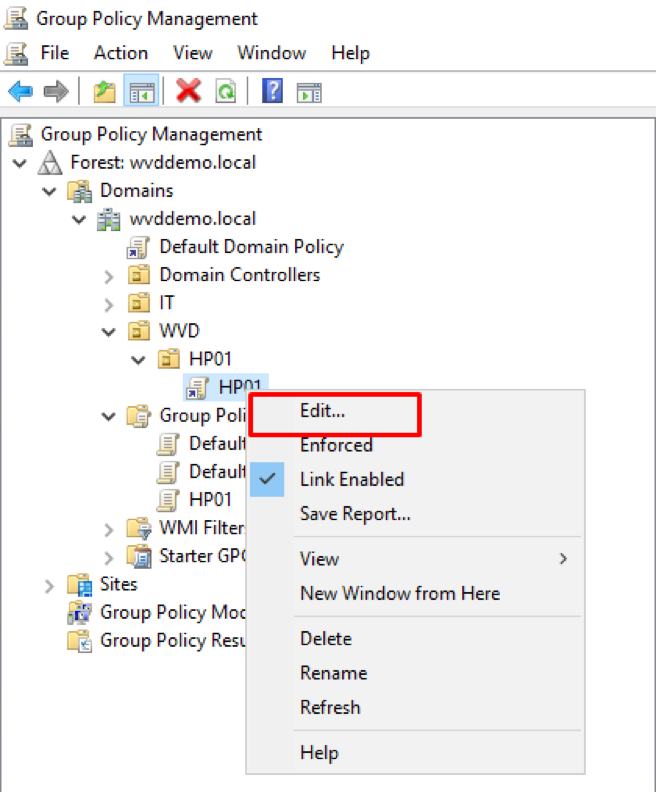
Figure 35 Editing WVD GPO
- In the Group Policy Management Editor, go to Computer configuration, then Preferences, and then Control panel settings.
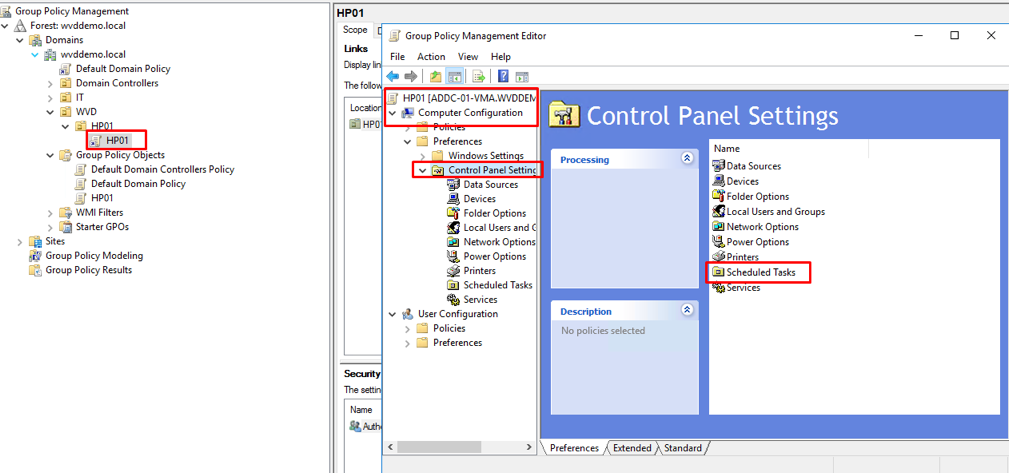
Figure 36 Configuring MS Defender for Endpoint Onboarding script task via GPO – Scheduled Task view
- Right-click Scheduled tasks, point to New, and then click Immediate Task (At least Windows 7).

Figure 37 Configuring MS Defender for Endpoint Onboarding script task via GPO – New Scheduled Task view
- In the Task window that opens, go to the General tab. Under Security options click Change User or Group and type SYSTEM and then click Check Names then OK. NT AUTHORITY\SYSTEM appears as the user account the task will run as.
- Select Run whether user is logged on or not and check the Run with highest privileges check box.
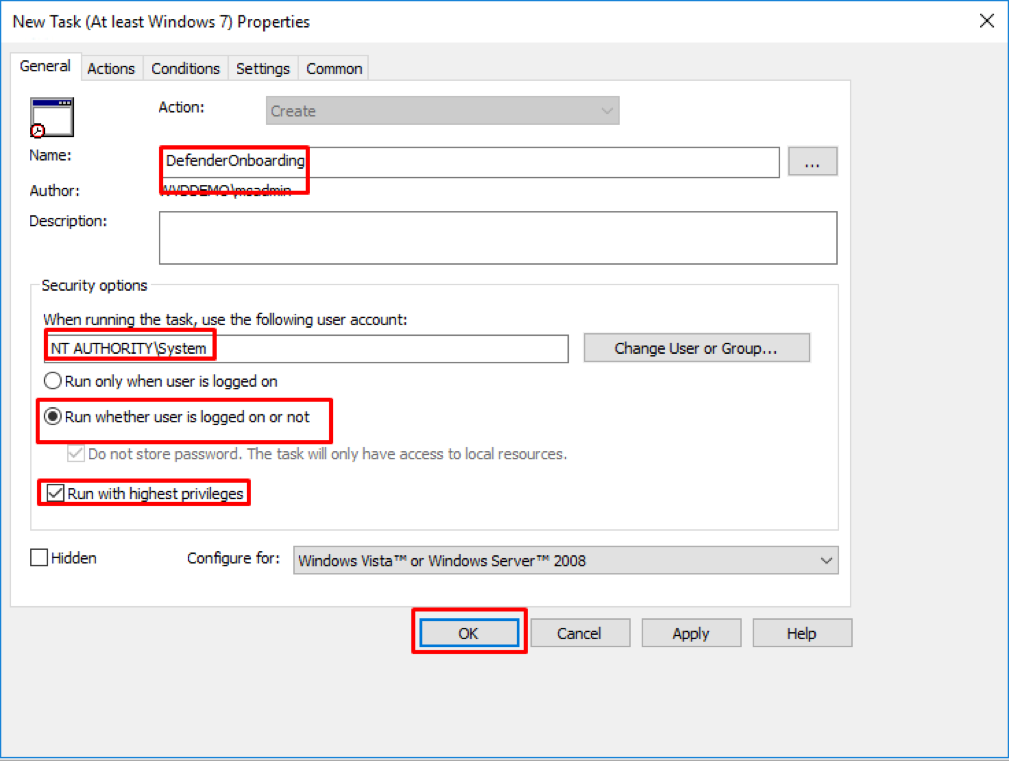
Figure 38 Configuring MS Defender for Endpoint Onboarding script task via GPO - finalising
- Go to the Actions tab and click New... Ensure that Start a program is selected in the Action field. Enter the file name and location of the shared WindowsDefenderATPOnboardingScript.cmd file.
- Click OK and close any open GPMC windows.
- Restart you AVD Session Hosts.
- In the Microsoft Defender Security Center > Device Inventory check whether our VMs have been successfully onboarded into our Microsoft Defender for Endpoints environment:
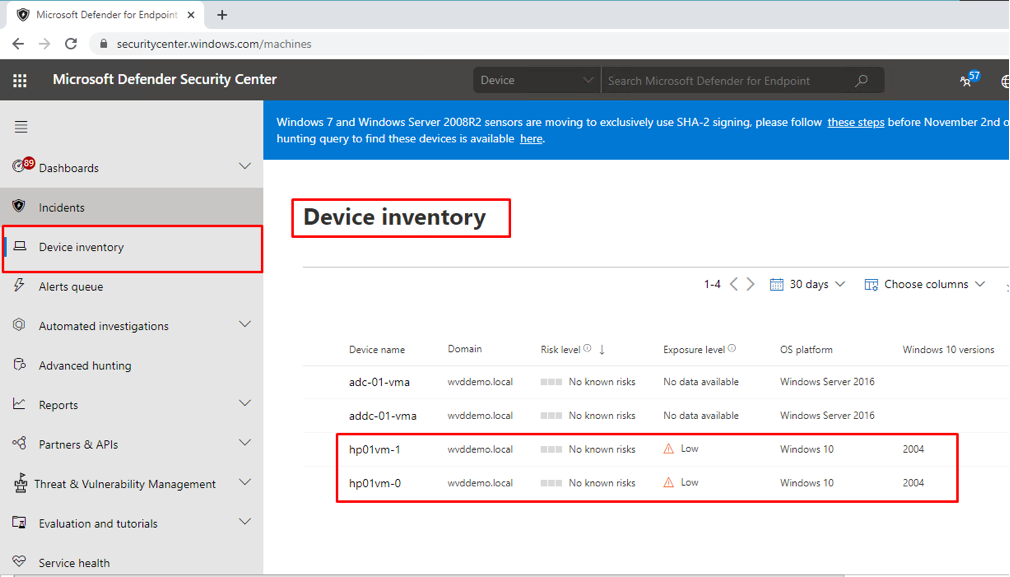
Figure 39 Azure Defender for Endpoint Device Inventory
The following table lists the all available tools based on the Windows OS endpoint that you need to onboard.
ONBOARDING TOOL OPTIONS LIST
| Endpoint | Tool options |
|---|---|
| Windows |
Group Policy – our approach
|
Table 3 Onboarding options
Conclusion: we have now set up a New Azure AD Tenant, sign up for Microsoft 365 Business premium free trial license, enabled ASC Azure Defender plan as well as the Microsoft Defender for Endpoint cloud service and also onboarded all our AVD Windows 10 Multisession (and Windows Server) Azure Active Directory hybrid-joined machines into it to be ready to start protecting them.
In the next blog post I am going to cover Protecting Azure Virtual Desktop with Security Center's integrated EDR solution topic.
Reference links
https://docs.microsoft.com/en-us/azure/security-center/security-center-wdatp
https://docs.microsoft.com/en-us/azure/active-directory/develop/quickstart-create-new-tenant